
SplashScreen in React Native App
Adding SplashScreen, displaying the logo and fetching necessary data in the background while showing SplashScreen to the user.

Splash Screen is an underrated feature in my opinion. It has a lot of good perks, 2 main important pros of having a solid SplashScreen for your application are as follows-
First Impression is the Last Impression, telling your users a bit about your product, What it does and What it is for?
Fetching necessary data when the SplashScreen loads in the background.
Handling of network errors like in case of the internet is not connected
These small edge cases provide a good user experience. Understand the way user open your application and just for few milliseconds while loading user data in the background. We are displaying a bit of information about our product using our logo and description, this gives a solid first impression in my opinion and helps the user to retain in the application.
Overview
We will be using the repository which we have created using Expo for react native application. (Read the installation)
Add the SplashScreen image of our application in the directory
Updating SplashScreen stay time on the application
Customizing the configuration of SplashScreen.
Fetching sample data in the background.
Adding SplashScreen
Expo out of the box provides expo-splash-screen a package to add SplashScreen to your application. If you are not using react-native you can use a simple https://www.npmjs.com/package/react-native-splash-screen npm package in that case.
https://docs.expo.io/versions/v40.0.0/sdk/splash-screen/To add SplashScreen choose the image you want as a SplashScreen and add that image to the assets folder of the root directory. Then go to app.json and see the key “splash” as an object, this will be your SplashScreen configuration. Inside the “splash” key object you can see the “image” key. Go ahead and edit that key with the name of the image you have added just now.
Customising SplashScreen & Fetching Data
Next, we will increase the stay time of our SplashScreen and fetch the data using sample API. The expo-splash-screen package provides 2 methods as follows -
hideAsync — Hide the SplashScreen immediately, otherwise the user can see the blank screen immediately.
preventAutoHideAsync — Show the SplashScreen as soon as the method is called
We can use methods to update the state of showing splash screen, on the basis of state value, we can make our API calls to fetch the data. Inside the App.js file, we have created a state called isAppReady which dictates the state of SplashScreen.
const [appIsReady, setAppIsReady] = React.useState(false);Approach
Make SplashScreen visible and fetch the date during that time
As soon as data fetched update the appIsReady value
After updating the value cross check the updated value if it's true then hide the SplashScreen
For fetching data we have created a function called prepare(). This method just fetches the data after showing the SplashScreen.

We have first shown the SplashScreen followed by fetching our data from sample API and updated the user's state from that data. Once that data is updated in the finally of try and catch we have updated the state of appIsReady. We still can't directly show the SplashScreen because the user can see the blank screen. If we immediately show the SplashScreen in the finally method the user will be kicked to a blank screen for few milliseconds.
Hence, we will use another react-native method called onLayout which gets called before the render method of the component and inside this onLayout we will hide the SplashScreen only when our appIsReady value is true. I am adding the image of the code for better understanding.
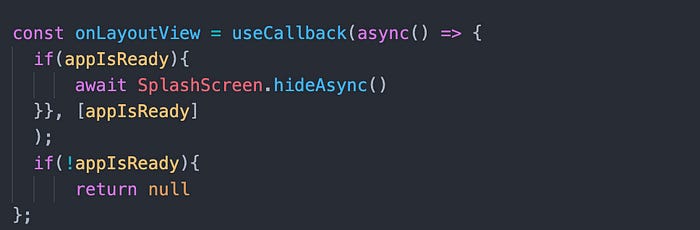
Inside the onLayout method, we have checked whether our appIsReady value is true or not and then accordingly we hide the SplashScreen using SplashScreen methods. We can now pass this onLayout method as a prop to our root component. You can read more about the onLayout method on the below link, it is a very useful method especially when you want to calculate the component dimensions dynamically.

This is how our whole app.js code looks like after adding everything, I am adding a video below to see how data fetches and how the SplashScreen looks on the real device.

Conclusion
Expo provides a very easy way to handle most of the important cases for developing a production-level application. In my opinion, it can be the future of react-native. I will cover more articles on animation, authentication and payment in react-native using expo, so stay tuned for that.
Until, next time, Have a good day, People.